SharePoint Presence Not Showing…
If you ever had the issue where your SharePoint site had presence turned on, but you could not see the presence indicator colors next to user names within lists/libraries or within the My Colleagues web part. Then Please read on for a solution.

The solution to view the presence indicators with full color is to add the site to your trusted sites.

Now when you refresh the page you will be able to see the presence indicators in full color.


The solution to view the presence indicators with full color is to add the site to your trusted sites.

Now when you refresh the page you will be able to see the presence indicators in full color.

Monday, August 3, 2009
SharePoint Reusable Content
I can pretty much say I know my way around SharePoint… But every once in a while you learn about a feature that you never knew was there… Most of the time its those annoying bugs that we call “features” but are true head against the wall things that make you go hmmmm… But this time its a good thing…
I was tasked with finding a way to create a header and footer for a publishing site. This header and footer would be consistent across all pages within the content area of the site. My First thought was ok I need a custom page layout, but this would not work since it needs to be easily updated via the SharePoint Interface.
So after some investigation I found out that SharePoint has a built in feature called “Reusable Content”
Basically all you need to do is simply edit the page of your publishing site and click on a content editor control. If you look at the image below there is a icon next to the image icon.
 The icon is not very obvious hence the reason why I never noticed it before… But if you click on this button you get the following list.

This is basically a list of all the reusable content that resides within that site collection.
If you don’t see what you like you can simply open up the list via the “Open List” button on the toolbar.
From that list you can now create either Reusable HTML or Text.

New Reusable HTML form:

Once you have edited your content and choosen it from the list you will see the Reusable content within a grey boxed in area within the content.

So, how many other people out there never knew this feature was there? Am I the only one? Leave a comment with your experiences.
I was tasked with finding a way to create a header and footer for a publishing site. This header and footer would be consistent across all pages within the content area of the site. My First thought was ok I need a custom page layout, but this would not work since it needs to be easily updated via the SharePoint Interface.
So after some investigation I found out that SharePoint has a built in feature called “Reusable Content”
Basically all you need to do is simply edit the page of your publishing site and click on a content editor control. If you look at the image below there is a icon next to the image icon.
 The icon is not very obvious hence the reason why I never noticed it before… But if you click on this button you get the following list.
This is basically a list of all the reusable content that resides within that site collection.
If you don’t see what you like you can simply open up the list via the “Open List” button on the toolbar.
From that list you can now create either Reusable HTML or Text.

New Reusable HTML form:

Once you have edited your content and choosen it from the list you will see the Reusable content within a grey boxed in area within the content.

So, how many other people out there never knew this feature was there? Am I the only one? Leave a comment with your experiences.
Thursday, June 4, 2009
SharePoint Branding Build Test Checklist
During the creation of the CSS, Master Pages, and Page layouts its critical to stay on top of your Front End Development testing.
As you know many classes in SharePoint are shared classes so when you make a modification to one element you have to test, test, test.
Below are some helpful things to review before giving that oh so critical demo… Hopefully these will help you out during your development process and testing.
As you know many classes in SharePoint are shared classes so when you make a modification to one element you have to test, test, test.
Below are some helpful things to review before giving that oh so critical demo… Hopefully these will help you out during your development process and testing.
- Create and test all OOTB SharePoint templates
- Publishing Sites
- Publishing Toolbar
- Page Layouts (All that are available)
- My Sites
- My Profile
- Organization Hierarchy web part
- In Common with you web part
- My Profile
- Team Sites
- Meeting Workspaces
- Tabs
- Recurring Meeting Workspaces Quick Launch
- Blog
- Unique Quick Launch
- Post date, title, content, and links
- Wiki
- Functional Links (Edit, History, Incoming Links)
- Unique Quick Launch (Recent Changes)
- Last Modified
- Search
- People search drop down options
- Search Results
- Advanced Search Link
- Advanced Search Page
- Central Administration
- Don’t spend to much time on these
- Publishing Sites
- Test as many SharePoint functions as you can
- Fly Out Menu’s/Drop Downs
- My Links
- Top Navigation
- Site Actions
- Modify Web Part
- Quick Launch if enabled
- Multi Tier/level if enabled
- Document Item Drop Down
- Button Hovers
- Search/Go
- Global Links (Top Links like My Links)
- SPLink (Welcome & Console Toolbar Buttons)
- Toolbar View Button
- Quick Launch
- Headers
- List Items
- Selected headers/Items
- Tree View
- Breadcrumbs
- Text
- Hyperlinks
- Carrots “>”
- Toolbars
- Calendar
- Date Picker
- Month View
- Week View
- Day View
- Current Day Indicators
- Lists/Libraries
- Datasheet View
- Alternating item shade (ms-alternating)
- Webpart
- Chrome/Title
- Border color/width if selected (ms-WPBorder)
- Separator Lines
- Edit Page
- Webpart Zone Colors
- Drag and Drop Style
- Webpart Chrome/Title’s
- Advanced Webpart Gallery and Options
- Admin Pages
- Site Settings
- List Forms
- Form Background (ms-authoringcontrols)
- Upload Document
- Error Pages
- OOTB Themes
- If you are going to allow OOTB themes you will have to test, test, and triple test that all themes work and function as expected with your custom design…
- Fonts/Colors
- Stick to system Fonts so that everyone gets the same experience. (Verdana, Tahoma, Arial, Etc)
- Page Titles
- Body Content
- Hyperlinks
- Hover Text
- Visited State
- Images
- Teamsite Default Image
- Social Meeting Workspace Image
- Customization/3rd Party
- Its kinda a given but any custom web parts, 3rd Party or custom controls implemented will need to have branding applied or tested before deployment onto prod servers.
- Fly Out Menu’s/Drop Downs
Friday, January 16, 2009
SharePoint Meeting Workspace: The red headed step child template...
I think we all know that building a custom design and master page requires lots of patience and open ended thinking.
The SharePoint Meeting Workspace template to say the least does not play nice with all of the other templates and master pages. These templates include the following:

Here is what the template normally looks like:

If you attempt to apply your custom master page to any one of these templates you will see something like this:

Note that the navigation tabs are gone and you get a message on the left saying: "There are no more meeting occurrences to select from." It also removes the function on the site actions to add or manage pages.
The issues above are caused because the controls below a not included into the regular "default.master" file. Microsoft decided that all meeting workspace site should use a different master page called "mwsdefault.master". This file is located on in the global folder on the 12 hive.
The following two controls make up the function for the custom site actions menu items
Well the best thing I would suggest is to take a copy of the mwsdefault.master and start adding in your customizations. You should not remove or hide any of the controls above as the functionality of the meeting workspaces will be gone.
Once you have all of your changes you will need to work with your developers on feature stapling your master page to a copy of the meeting workspace site definitions.
The SharePoint Meeting Workspace template to say the least does not play nice with all of the other templates and master pages. These templates include the following:
- Basic Meeting Workspace
- Blank Meeting Workspace
- Decision Meeting Workspace
- Social Meeting Workspace
- Multipage Meeting Workspace

Here is what the template normally looks like:

If you attempt to apply your custom master page to any one of these templates you will see something like this:

Note that the navigation tabs are gone and you get a message on the left saying: "There are no more meeting occurrences to select from." It also removes the function on the site actions to add or manage pages.
The issues above are caused because the controls below a not included into the regular "default.master" file. Microsoft decided that all meeting workspace site should use a different master page called "mwsdefault.master". This file is located on in the global folder on the 12 hive.
The following two controls make up the function for the custom site actions menu items
- <Meetings:CustomToolPaneManager runat="server" __WebPartId="{E5EF4B97-0A6B-4E44-B210-813789452367}" __MarkupType="vsattributemarkup" WebPart="true" Height="" Width=""/>
- <Meetings:PropertyBag runat="server"/>
- <Meetings:PageTabsWebPart runat="server" __MarkupType="vsattributemarkup" WebPart="true" Height="" Width="" __WebPartId="{80A0AA76-9C8C-45B7-B01D-FF0F3E8CB8EC}" id="g_80a0aa76_9c8c_45b7_b01d_ff0f3e8cb8ec"/>
Well the best thing I would suggest is to take a copy of the mwsdefault.master and start adding in your customizations. You should not remove or hide any of the controls above as the functionality of the meeting workspaces will be gone.
Once you have all of your changes you will need to work with your developers on feature stapling your master page to a copy of the meeting workspace site definitions.
Wednesday, October 22, 2008
Example: SharePoint Branding Install Instructions
After all branding files have been created we as designers sometimes don't get the option to install and implement the visual design ourselves. So the creation of an Install Guide can be important in two ways.
- Ability for the site owner/Administrator to have a back up guide on how to re-apply the visual design in case of a Disaster Recovery.
- If someone other than the creator of the branding files needs to apply the branding due to security reasons/Location.
- Publishing Site
- Custom Master Page
- Custom Page Layout
- Custom CSS
- Custom Images
- Enable the Office SharePoint Server Publishing Infrastructure Feature for the top level site collection.
- Click on Site Actions > Modify All Site Settings
- Click on Site collection features
- Make sure the "Office SharePoint Server Publishing Infrastructure" is Active
- Enable the Office SharePoint Server Publishing for the site.
- Click on Site Actions > Modify All Site Settings
- Click on Site features
- Make sure the "SharePoint Server Publishing" is Active
- Go to the following directory on the server (if there are more than 1 web server make sure this is done on each)
- C:\Program Files\Common Files\Microsoft Shared\web server extensions\12\TEMPLATE\IMAGES
- Copy over the “XYZ_Images” folder.
- Go to the following directory on the server (if there are more than 1 web server make sure this is done on each)
- C:\Program Files\Common Files\Microsoft Shared\web server extensions\12\TEMPLATE\LAYOUTS\1033\STYLES
- Copy over the “XYZ_Styles” folder.
- From the top level site collection do the following:
- Click on Site Actions > Modify All Site Settings
- Click on “Master pages and page layouts”
- Upload both the “XYZ_Custom.master” and “XYZ_PageLayout.aspx” files. Make sure these files are Checked in as a major version, and Accepted if approval is required.
- Change the XYZ_Custom.master file properties to the following:
- Content Type: Publishing Master Page
- Change the XYZ_PageLayout.aspx file properties to the following:
- Content Type: Page Layout
- Content Type Group: Page Layout Content Type
- Content Type Name: Welcome Page
- From the top level site collection do the following:
- Click on Site Actions > Modify All Site Settings
- Click on “Master page”
- Choose the “XYZ_Custom.master” for both the Site Master Page, and the System Master Page.
- Check off the boxs to reset all sub sites.
- At the bottom of the page click on Specify a CSS to be used… and paste in the following path:
- /_layouts/1033/styles/xyz_styles/xyzstyle.css
- Check off the box to reset all sub sites.
- From the top level site collection do the following:
- Click on Site Actions > Edit Page
- In the Toolbar click on the “Page” button then “Page Settings”
- Under Page Layout section choose “xyz_PageLayout.aspx” from the drop down
Monday, October 13, 2008
Brand your site by using: Features, Site Definitions, and Custom Master Pages
I will walk you though a few steps to implement your branding by using custom Site Definitions, Master Pages, and Features.
Images:
Place all modified images in a new folder in the following directory
Create a separate CSS file and place it in a new folder in the following directory.
Go to the following directory on the server (if there are more than 1 web server make sure this is done on each)
Go to the following directory on the server (if there are more than 1 web server make sure this is done on each)
I will refer to this post for creating this part of the process:
http://techietweaks.blogspot.com/2008/08/creating-custom-sharepoint-masterpage.html
Install Feature:
Open up a command prompt
Open up a command prompt and type “IISRESET”
**** Make sure the permissions that are set to that new folder are the same as the original or basic users will get prompted for authentication because they don’t have permission for the images/styles ****
Delete all temporary internet files from your browser and then refresh the page
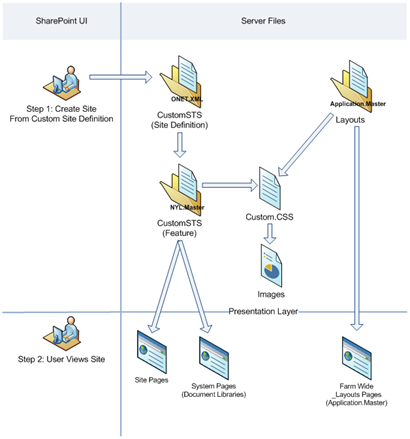
Here is a diagram that explains how this all works:
Images:
Place all modified images in a new folder in the following directory
- C:\Program Files\Common Files\Microsoft Shared\web server extensions\12\TEMPLATE\IMAGES\Custom
Create a separate CSS file and place it in a new folder in the following directory.
- C:\Program Files\Common Files\Microsoft Shared\web server extensions\12\TEMPLATE\LAYOUTS\1033\STYLES\Custom
Go to the following directory on the server (if there are more than 1 web server make sure this is done on each)
- C:\Program Files\Common Files\Microsoft Shared\web server extensions\12\TEMPLATE\LAYOUTS
- Add a <link type="text/css" rel="stylesheet" href="" /> in the head of the Application.Master to your alternate stylesheet.
Go to the following directory on the server (if there are more than 1 web server make sure this is done on each)
- C:\Program Files\Common Files\Microsoft Shared\web server extensions\12\TEMPLATE\SiteTemplates
- Make a copy of the “STS” folder and re-name it to something like "CUSTOMSTS".
- Go to C:\Program Files\Common Files\Microsoft Shared\web server extensions\12\TEMPLATE\1033\XML
- Copy the “WEBTEMP.XML” File, Re-Name it.
(Ex: WEBTEMPCUSTOM) and change all references from STS to CUSTOMSTS. This post does not effect any of the MPS or Meeting workspace sites. So delete all Templates that refer to MPS.
I will refer to this post for creating this part of the process:
http://techietweaks.blogspot.com/2008/08/creating-custom-sharepoint-masterpage.html
Install Feature:
Open up a command prompt
- Type the following:
- “C:\Program Files\Common Files\Microsoft Shared\web server extensions\12\BIN\stsadm.exe” –o installfeature –filename CUSTOMSTSMasterPage\feature.xml
Open up a command prompt and type “IISRESET”
**** Make sure the permissions that are set to that new folder are the same as the original or basic users will get prompted for authentication because they don’t have permission for the images/styles ****
Delete all temporary internet files from your browser and then refresh the page
Here is a diagram that explains how this all works:

Comments
Post a Comment