
Display profile proporties in table style

Display Profile Properties in Table Style

I would like to show you, how you can display profile properties in a table. For example this would allow you to generate a telephone directory from your profile data.

Briefly this would be done in two steps: indexing your profile properties and displaying them with a People Results Web Part.

Let's start creating a managed property. Every property you would like to display on the list, must be crawled by the index and mapped to a managed property.

Creating a managed property
  1. On the SSP admin site, go to the "User profile and property" page, select "View Profile Properties" and select the profile property, you want to display. You could also create new properties.
  2. Make sure that the checkbox "Indexed" is selected.
  3. Repeat this set for every property.
  4. Do a full crawl of the SSP/MySite content source (usually the "Local Office SharePoint Server sites")... and wait until it is completed.
  5. Now you can create managed properties. For this, go to "Search Settings" and choose "Metadata property mappings".
  6. First check, if your desired property is no all ready managed. If not, create a new managed property and add a mapping to the crawled property.
  7. Again start a full crawl.

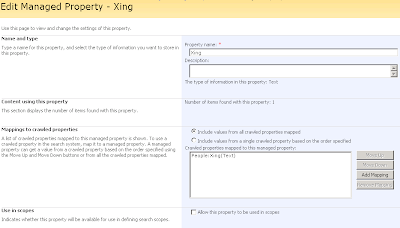
Sample with the managed property "Xing" which is mapped to the crawled propery "Xing".

Bringing the properties to the screen

Of course you could write a Web Part which iterates over the profiles and then render the data in a gridview. But you can also do this by configuration with the People Search Core Results Web Part.
  1. To begin, you have to create a new Web Part Page and add the "People Search Core Result s".
  2. In the Web Part Properties you set a "Fixed Keyword Query" and select a Cross-Web Part Query ID different from "user query". As "Fixed Keyword Query" you could enter contentclass:"SPSPeople" to display all profiles. But you can also define a custom query, which matches only to a parts of the profiles in your Shared Service Provider.


  3. Under "Selected Columns" add a line for every Managed Property. Check first, if it's not allready there. In our sample, I added <column name="Skills"> before the closing </columns> tag.
  4. Now we have to edit the XSL. If you are a native XSL speaker like my fellow worker Dänu, you can start creating your XSL and can stop reading here.


  5. If not, here some tricks how this could be done. I would suggest, that you copy the existing XSL. This XSL could be used later as a starting point.
  6. With the following XSL you can output the XML code of the search resutls.
    <?xml version="1.0" encoding="utf-8"?>
    <xsl:stylesheet version="1.0" xmlns:xsl="http://www.w3.org/1999/XSL/Transform">
    <xsl:template match="@* | node()">
    <xsl:copy>
      <xsl:apply-templates select="@*|node()" />
    </xsl:copy>
    </xsl:template>
    </xsl:stylesheet>

    Copy & Paste it in to the XSL editor field and hit "Apply".
  7. Now you have to look at the HTML source code. Search for and copy the hole tag (until the closing ) to the clipboard. In this XML you will see all the properties returned by SharePoint.
  8. If you are familiar with Visual Studio 2008 you could use it to generate a new XSL. Save the XML output to a file und try to run the XSL against that file (Menu: XML \ Show XSLT Output).

Here is a sample XSL which display the name, the e-mail and a like to a Xing profile.

<xsl:stylesheet version="1.0" xmlns:xsl="http://www.w3.org/1999/XSL/Transform" >
<!-- XSL transformation starts here -->
<xsl:template match="/">
<table>
  <tr>
    <td>Name</td>
    <td>Email</td>
    <td>Xing</td>
  </tr>
  <xsl:apply-templates />
</table>
</xsl:template>

<!-- This template is called for each result -->
<xsl:template match="All_Results/Result">
<xsl:variable name="id" select="id"/>
<xsl:variable name="url" select="url"/>
<tr>  
  <td>
    <a href="{$url}" id="{concat('CSR_',$id)}">
      <xsl:value-of select="preferredname"/>
    </a>
  </td>
  <td>
    <xsl:value-of select="workemail"/>
  </td>
  <td>
    <xsl:if test='string-length(xing) &gt; 0'>
      <a href="{xing}" id="{concat('XING_',$id)}">
        <xsl:value-of select="xing"/>
      </a>
    </xsl:if>    
  </td>
</tr>  
</xsl:template>
</xsl:stylesheet>

Comments

  1. sorry i copied only for my reference and it was a mistake that i published !!!!!

    ReplyDelete

Post a Comment

Popular posts from this blog

Sharepoint 2010 Subsites webpart

This posting was originally made by Arild Aarnes and it is in here . This is a simple webpart to show a list (with links) of subsites immediately below the current site. This webpart will work on both Sharepoint 2010 and Sharepoint Foundation. On Sharepoint 2010 you could have used the built in “Table of Contents” webpart to do similar things but this one can also display the list as a dropdown list to save space on the webpage and it can open links in a new window. All the settings can by edited in the webpart configuration panel. The settings are: Show bullet in list – this will display the small square gif in front of the site name Open link in new window – this will open the subsite in a new window Show Site Description – this will show the description you entered when you created the subsite Show icon – Shows a icon for the type of subsite, see picture. Show as dropdown list – Will display the subsites in a dropdown box to save space. The webpart can be downl

Configuring the User Profile Service in SharePoint 2010

I will share with you my step by step guide in setting up the User Profile Service application, focusing on its configuration and administration and how we can enable the creation of user profiles via an Active Directory import . SharePoint 2010 introduces the notion of “Service Applications” which build’s upon the “Shared Services Provider (SSP)” which was introduced in SharePoint 2007.  Service Applications are individual services that can be configured independently and can be shared across other sites within your farm with some service applications that can also be configured across farms. The individual service applications provided with SharePoint 2010 are listed as follows; Access Services Business Data Connectivity Document Conversion Excel Services Managed Metadata Service PerformancePoint Search Service Secure Store State Service Visio Graphics Service User Profile Service This article will build upon our initial SharePoint 2010 install utilizing the least privi

The Text Filter Web Part – Without Having To Filter Exact Text

This posting I took it from  Here   This applies to both SharePoint 2007 and 2010.  In MOSS Enterprise, and the 2010 version of Enterprise.  There is an out-of-box web part called the Text Filter Web Part .  Basically, when you put this web part on a page, and put a list or library web part on the same page, you then create a web part connection that sends the text typed in the box as a filter to one of the columns in the web part, like this: The name Molly Clark had to be typed in exactly.  So, if you typed “Molly”, this record would not come up.  People use the text filter web part when they just want to search a single column in a list or library.  Otherwise, you’d simply use the “Search” box at the top of the screen, choose “This List” or “This Site” and perform SharePoint searches that way. One more note before I get into today’s solution: If you’re making use of site columns in your lists, there’s a setting where you can specifically select which columns you do N

Telephone format for a text box on infopath form

If you want to create a Telephone format on a infopath form : 1. Add a text field to the form (Even if it is the list or a blank form) 2. Select the text box and click on Manage Rules 4. Add a rule to your textbox control with the following conditions (make sure to select "and" operator):     a. field "does not match pattern" Phone number     b. the expression: string-length(translate(., "()- ", "")) = 10     c. the expression: string-length(translate(., "()- 0123456789", "")) = 0 5. Add action to the rule:     a. Set a field's value     b. Select your textbox field     c. Insert formula for the value (click the fx button): concat("(", substring(translate(., "()- ", ""), 1, 3), ") ", substring(translate(., "()- ", ""), 4, 3), "-", substring(translate(., "()- ", ""), 7, 4)) Link for the detailed explanation :  http:

HOWTO: change the home button text on the top link bar in sharepoint 2010

Hi All, I got a requirement that the title of the site collection which shows the first button on the top link bar to be different from the title. for example: my sharepoint site title is " Srikanth SharePoint Blog" and I need to show"Home" on the top link bar. It shows Home when the publishing features are not enabled. But once the publishing features are enabled it shows the same as the title("srikanth sharepoint blog" in my case instead of "Home").In other blogs I saw the solution as "in SITE ACTIONS>SITE SETTINGS>LOOK AND FEEL> TOP LINK BAR" , but once the publishing features are enabled, you don't see the "TOP LINK BAR" under "LOOK AND FEEL"(ofcourse it is changed to "NAVIGATION" , when publishing features are enabled). In this case : 1. Hide the initial button by adding code in css.    .s4-tn li.static > a{ display: none !important; } .s4-tn li.static > ul a{ display: bloc

SharePoint Branding and Design in 2010-2

Update: Really Small SharePoint Calendar I really was not that happy with the look of the first calendar so after some modifications and a bit of CSS magic I have come up with a really good looking small calendar. At least I think so… Basically I have replaced the text of an event item with a color coded box. The benefit that you get out of this is that you don’t have to try and read the even within the small calendar but if you hover over and click on the color block you get the list Item display. Orange is for single event items (8am-10am, etc) Green is for full day events or repeat events Another nice feature to this is that I have also simplified the visual indicator when there are more then two event items in one day. Instead of seeing the arrow and text all you see is the arrow. Once you click on the arrow it will show the other blocks of events (Right image). Here is the CSS Code: Download Here Simply place a content editor web part on the same page as the calendar

SharePoint Branding and Design in 2010

Hide First Tab in SharePoint 2010 Navigation I created a blog post on this for SharePoint 2007 HERE : But SharePoint 2010 is a bit more complex. Since it uses UL’s and Li’s for it’s navigation it is a bit harder to hide just one element. You will notice that the Home tab actually is the first node and then has a child UL which represents the rest of the navigation Items. So the approach is to hide the first <li> <a> (display: none) and then simply just use (display:block ) to show the hidden <ul> <li> <a> tags. Here is the CSS you could use to hide just the first node (home) tab in a SharePoint 2010 application: .s4-tn li.static > a{ display: none !important; } .s4-tn li.static > ul a{ display: block !important; } Enjoy! Posted by Erik Swenson at 12:12 PM 2 comments Labels: Branding , CSS , SharePoint 2010 Wednesday, August 18, 2010 How To: Hide Left Side Navigation on Home Page I was recently asked: " How can I hide the sid

Data View conditional formatting using SharePoint Designer

Data View conditional formatting using SharePoint Designer This article demonstrates how to use SharePoint Designer 2010conditional formatting to format items in a SharePoint (SPS 2010) list based on item metadata. The example uses a standard SharePoint task list and formats tasks based on the due date. The end result is a list view sorted by due date with item text or background coloured to represent the number of days until the due date. The Process In this example I have started with a standard task list and have created a few sample items for testing / demonstration. From the task list, create a new view, starting from the default “Active Items” view (filtered to only display incomplete tasks). The view created in the example is called “Active – Coloured” Open the view using SharePoint Designer. Right click on the List View Web Part and select “Convert to XSL Data View”. This will automatically convert settings for the current view into da